Hello again;
let's
now complete the tutorial of making engraving effect, we have explained in the first part the way of blending
the paths.
In this part we will use all the illustrator files that we have created,
it will be the basis of the engraving process
In Photoshop
Open B5 file with 200 pixels/inch and put mosque photo and the texture (the
texture will be used later)
actually this
is not a usual photo of a mosque ... it is (The Dome of the Rock) located
in Jerusalem (Al-Quds)
Go to image> adjustment> desaturat,
and adjust curves a little bit by pressing ctrl + m and make it
like this pic
copy the mosque layer 6 copies by selecting the layer and pressing ctrl
+ j (5) times
Now we will import vector files that we've created in the first part (lesson
link), they are:
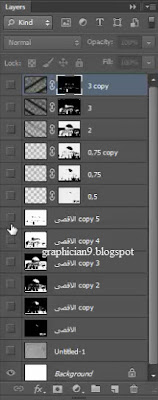
0,50 pt
0,75 pt
2 pt
3 pt
You have to resize all victor files to become the same size of the bag
(b5) then make them pixlis (by right click on them and rasterize layers)
then make a copy of ( 3 pt) (0,75pt) and flip the copies horizontal
Hide all layers and prepare for work.
Hide all layers and prepare your self
Quick Review: We now have 6 layers of the mosque , as well as 6 layers
for vectors files . and one for the texture
.........................................................................
The next step will be repeated in all layers so
be attention please:
The firs layer of the mosque: go to image > adjustment >
threshold
Threshold level = 230 ... We have 2 color pic
go to select> color range as the following
image and press ok
keep the resulting selection and move on to a
layer 0,50 pt then press the mask button
we will repeat the same process on the remaining
layers, taking into account reducing 40 of the threshold value at a time:
layer (0.75) threshold
level = 190
layer (0,75 copy) (which is copied from class 0.75) determine the
threshold = 150
layer (2) .... threshold = 110
layer (3 copy) .... threshold = 70
layer (3) ..... threshold = 30
don't forget to determine color range everytime
The result (after hide all layers of the mosque
and show the vectors layers) are as follows:
It almost final result, but with some
improvements on 2pt layer, we will click on the mask and then with brush tool
(black color) ease the upper part of the mask.. Shown in the following image
now put the texture under all layers
and make all layers overlay and 90 opacity 80
Well I hope Subscribe the blog
Updating:
the video of this tutorial:
Hello again;
let's
now complete the tutorial of making engraving effect, we have explained in the first part the way of blending
the paths.
In this part we will use all the illustrator files that we have created,
it will be the basis of the engraving process
In Photoshop
Open B5 file with 200 pixels/inch and put mosque photo and the texture (the
texture will be used later)
actually this
is not a usual photo of a mosque ... it is (The Dome of the Rock) located
in Jerusalem (Al-Quds)
copy the mosque layer 6 copies by selecting the layer and pressing ctrl
+ j (5) times
Now we will import vector files that we've created in the first part (lesson
link), they are:
0,50 pt
0,75 pt
2 pt
3 pt
You have to resize all victor files to become the same size of the bag
(b5) then make them pixlis (by right click on them and rasterize layers)
then make a copy of ( 3 pt) (0,75pt) and flip the copies horizontal
Hide all layers and prepare for work.
Hide all layers and prepare your self
Quick Review: We now have 6 layers of the mosque , as well as 6 layers for vectors files . and one for the texture
The next step will be repeated in all layers so
be attention please:
The firs layer of the mosque: go to image > adjustment >
threshold
Threshold level = 230 ... We have 2 color pic
we will repeat the same process on the remaining
layers, taking into account reducing 40 of the threshold value at a time:
layer (0.75) threshold
level = 190
layer (0,75 copy) (which is copied from class 0.75) determine the
threshold = 150
layer (2) .... threshold = 110
layer (3 copy) .... threshold = 70
layer (3) ..... threshold = 30
don't forget to determine color range everytime
now put the texture under all layers


